How it works
When reading these instructions it may be helpful to have a blank scorecard in front of you. You can download a free sample of the 9-batter or 12-batter version. It may also be useful to refer to the official MLB rules, in particular the section on scorekeeping.
Contents
- Anatomy of the Scorecard
- Scoring Plays
- Optional Data
- Notation Reference
- Notation Examples
- Three-Inning Example
1. Anatomy of the Scorecard
Batters
The method for listing batters, pitchers and substitutions is copied nearly verbatim from Project Scoresheet. In the Batters area make sure to record each player's uniform number in the # column (this is vital). About the shaded columns, the first thing to note is the difference between the single offensive IN column and the five defensive columns. The offensive IN column refers to the first box in which the player appears as a batter or baserunner. The value is always the same for starters (unless they leave the game before their first at-bat, in which case cross out the printed number).

The defensive P column is for the player's position, and the IN column is for the number of the box on the opponent's scorecard in which the player first appears at this position. Note that defensive column numbers always refer to the boxes on the opponent's scorecard. The second set of P/IN columns are used if the player changes position, and the O (for "out") column is for the last box in which the player appears defensively (again, the number of the box on the opponents' scorecard). This system requires you to be fairly meticulous but will ensure that you credit all runs and errors to the correct players. Should you run out of space for batters use the ADDITIONAL BATTERS area and be sure to indicate the batter's lineup slot in the BATS column (the IN column is not enough in the case of pinch runners, and not all players may actually bat despite having a slot in the lineup).
Pitchers
To minimize page-turning, all pitchers are listed on the opponent's scorecard (and their IN and OUT numbers also refer to boxes on the opponent's scorecard, but we're already there). Again, IN is the box in which they enter the game, OUT is the box in which their last pitch is thrown (or out recorded, in the case of a pickoff before the first pitch). When adding up totals you may also indicate the decision (if any) in parentheses after the pitchers' names. If you're tracking pitches, log per-inning and game-so-far pitch totals (in white and shaded columns respectively). This will make you especially popular at the ballpark with anyone interested in the pitch count.
Totals

Team, batter, and pitcher totals should be mostly self-explanatory. Shaded columns between innings are for optional game-so-far totals. Pitch totals are in the format: strikes/total pitches (subtract to get balls). Note that there are no totals columns for additional batters so you'll have to use some of your blank space. Also remember that you are recording opponents' error totals (hence "oE").
Auxiliary Box
If the third out of an inning occurs mid-at-bat (such as on a pickoff or caught stealing) and the same batter begins the at-bat anew in the next inning, record the second at-bat in the auxiliary box, making sure to number the box in the upper left-hand corner so you know when it occurred (use, for example, 24.5 or 24A). If this happens more than once you will have to start renumbering boxes at the end of the main section of the scorecard or draw more auxiliary boxes in the blank space.
Proof Box
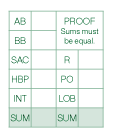
When the game is over and you have summed the stats for all players, it's time to prove your scorecard—a good way of checking for mathematical errors. The proof box defines an ancient formula first used by the Greeks: at-bats + walks + sacrifices + hit batsmen + interference calls = runs + putouts + runners stranded. If these two sums are not equal, go find your mistake. (The sum should also be the number of the last at-bat box used.)
Event Boxes

The scorecard divides each event or at-bat box into two sections: the top section with the diamond is used to record a "situation" and the bottom section is for a "catalyst" (the columns on the left are for pitches). As the game progresses, one situation leads to the next by means of a catalyst. An example of a situation is: "Quilvio Veras on second, Rafael Furcal on third, Chipper Jones batting." An example of a catalyst is: "sacrifice fly which advances both runners one base (Furcal scoring)" or "3-1 ground out down the first base line, runners hold." I'll explain how to notate these in the next section. Note that boxes are used continuously—that is, don't move to the next column for a new inning, just darken the line between boxes and indicate the number of the new inning.
2. Scoring Plays
Situations
In the top part of the box (on the diamond) write the uniform number of each player next to the base they occupy at the beginning of the at-bat. If it's the batter's first appearance mark whether he is hitting left or right-handed with an L or R on home plate. You only need to mark this again in subsequent at-bats if he bats from the other side.
Catalysts
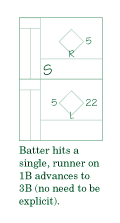
In the bottom part of the box write the Project Scoresheet code (see below for code definitions and examples) for what the batter does and where the baserunners go on the play. Baserunner advancement may be omitted if it will be obvious from the following situation diagram and hence is only necessary when a runner is thrown out.
In-At-Bat Runner Movement
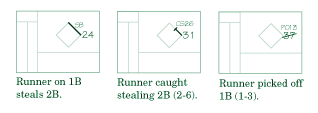
If a baserunner advances during an at-bat (such as on a stolen base or passed ball), darken the relevant baseline and label it with the appropriate Project Scoresheet code. If a runner is picked off or thrown out trying to advance, draw a line halfway down the basepath and label it (e.g., CS(26) or PO(13)). Project Scoresheet fans will notice the situation diagram also contains the information that would go in the top line of a Project Scoresheet box.
Scoring Runners
If a runner scores as a result of what happens in an at-bat and the batter is credited with an RBI, circle the runner on the diamond. If the baserunner scores but the batter does not receive an RBI (such as on an error), underline the runner. If a runner has advanced during the at-bat you should still circle their number (as opposed to the base they actually scored from) to avoid confusion. On a home run, circle home plate too (including the L or R if batter handedness is specified).
Fates
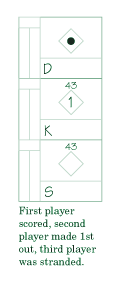
Every player who comes to the plate will meet one of three fates (sorry to sound pessimistic, that's just the way it is): they will score, they will be put out, or they will be left on base (OK, their at-bat could also be prematurely terminated by a pickoff; remember to begin their next at-bat in the auxiliary box if this happens). This information is recorded in the center of their diamond. If a player makes an out, write the number of the out in the center of their diamond (note that these may not be sequential). If they score, draw a dot. If they are left on base their diamond will be blank. This is the only backtracking you should have to do with Reisner Scorekeeping, and it's not strictly required (a batter's fate can be determined by reading a few boxes ahead), but it is convenient. If an at-bat ends with a pickoff or caught stealing you should do something to indicate that the batter avoided confronting his fate—perhaps an X in the diamond?
Pinch Hitters and Runners
If a pinch hitter comes into the game, enter them on the line immediately underneath the batter they replaced and enter the current event box number in their Off IN box. If they take the field you can fill in their position (Def P/IN). If they never take the field you can write "PH" in their Def P box to indicate that they were only a pinch hitter.
If a pinch runner enters the game, add the pinch runner to the lineup on the line directly underneath the batter he replaced, and put the number of the box in which he enters the game in his "Off IN" column (this should be the box after the batter's.) Write the pinch runner's uniform number on whatever base he occupies in the box after the batter's (as you do before every at-bat).
In the case of pinch hitters and runners, be sure to write the number of the last-used box from the other team's scorecard in the replaced player's "Def OUT" box.
3. Optional Data
Pitches
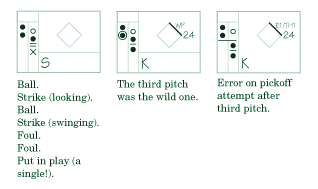
There are two columns down the left side of each at-bat box. The left-hand column is for balls and the right-hand one for strikes, fouls, and balls in play. In the strikes column, use a solid dot for a swinging strike, an open dot for a called strike, a dash for a foul, and an X for a ball put in play. In the balls column use open dots for intentional balls and solid dots for all others. If there is baserunner activity during an at-bat you can indicate when it occurred with a line across the pitch columns (if it occurred between pitches, like a pickoff) or by circling the pitch (if it occurred "on" a pitch, as on a wild pitch or stolen base).
Hits
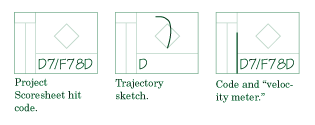
There are at least three ways to record hit data. Project Scoresheet defines an extensive system of codes for describing the location of a hit which can be entered in the catalyst area. Feel free to use them if you know them and have room in your catalyst area (but remember that other people may not understand the codes). Another way to record hit data is to trace the flight of the ball on the diamond (use a dotted line for a ground ball). Approximate the curvature and the spot where the ball landed or was caught. A third way is to draw a line up the left-hand edge of the box representing the velocity of the batted ball. This won't tell you the location (though it can if combined with ball-in-flight sketch or Project Scoresheet codes) but it can be done quickly and will tell you basically how well the player is hitting the ball (or how hard the pitcher is being hit).
4. Notation Reference
| Players | |
|---|---|
| pitcher | 1 |
| catcher | 2 |
| first baseman | 3 |
| second baseman | 4 |
| third baseman | 5 |
| shortstop | 6 |
| left fielder | 7 |
| center fielder | 8 |
| right fielder | 9 |
| designated hitter | 0 |
| pinch hitter | PH |
| pinch runner | PR |
| Baserunners | |
| batter | B |
| runner on 1B | 1 |
| runner on 2B | 2 |
| runner on 3B | 3 |
| Bases | |
|---|---|
| 1B | 1 |
| 2B | 2 |
| 3B | 3 |
| home | H |
| Batter Events | |
| single | S |
| double | D |
| ground-rule double | DGR |
| triple | T |
| home run | H |
| walk | W |
| intentional walk | IW |
| strikeout | K |
| hit by pitch | HP |
| fielder's choice | FC |
| error | E |
| foul ball error | FLE |
| Modifiers | |
|---|---|
| ground ball | /G |
| line drive | /L |
| foul | /FL |
| bunt | /B |
| throw | /TH |
| forceout | /FO |
| ground ball double play | /GDP |
| fly ball double play | /FDP |
| line drive double play | /LDP |
| other double play | /DP |
| triple play | /TP |
| sacrifice hit (bunt) | /SH |
| sacrifice fly | /SF |
| interference | /I |
| Basepath Labels | |
| stolen base | SB |
| caught stealing | CS |
| pickoff | PO |
| pickoff error | POE |
| balk | BK |
| passed ball | PB |
| wild pitch | WP |
5. Notation Examples
| Ground out to second baseman. | 43 |
| Unassisted ground out to first baseman. | 3/G |
| Fly out to center. | 8 |
| Foul out to catcher. | 2/FL |
| Catcher makes foul ball error. | FLE2 |
| Strikeout, catcher drops third strike and throws to 1B. | K23 |
| Strikeout on wild pitch, batter reaches 1B. | K+WP |
| With two strikes, foul bunt or caught foul tip. | K mark pitch as swinging strike |
| Error on shortstop fielding grounder. | E6/G |
| Ground ball, second baseman overthrows 1B, batter advances to 2B. | E4/TH/G.B-2 |
| Error on first baseman receiving throw from third. | 5E3 |
| Double play on grounder to second baseman. | 46(1)3/GDP |
| Double play on fly ball to rightfielder (runner on second tagged and was thrown out). | 9/FDP.2X3(95) |
| Runner on 1B thrown out by rightfielder trying to score on a double. | D.1XH(92) |
| Runner on 2B, batter singles to right, scoring runner, then gets put out in a rundown trying to stretch it to a double. | S.BX2(92646) circle the runner on 2B |
| Runner on 3B, batter singles to right, scoring runner, and goes to second on fielding error by rightfielder. | S(3-H).B-2(E9) |
| Runners on 1B and 3B, batter bunts, catcher’s throw to 2B pulls SS off the bag; SS throws the ball into the 1B dugout trying to get the batter, allowing runner on 3B to score (the batter "reaches on" a fielder’s choice and is "credited with" a sacrifice bunt for advancing the runner; the "2" in "FC2" refers to the catcher). | FC2/SH.3-H(E6/TH1) underline runner on 3B |
| Bases loaded, no outs, batter grounds into a double play (runners forced at 3B and 2B, runner from 3B scores, batter reaches 1B. "NR" reminds us that no RBI is credited to the batter, and "/FO" tells us he reached 1B safely. | 5(2)4(1)/FO/GDP.3-H(NR) |
| Unassisted triple play by third baseman on line drive. | 5/L.5(3)5(2)/TP |
6. Three-Inning Example
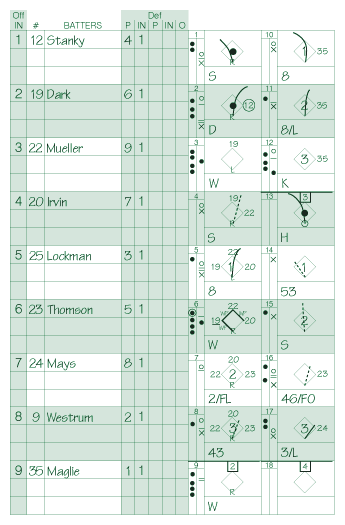
First Inning
1: Ball, ball, strike (looking), foul, put in play (line drive single to left field). 2: Runner (Stanky) on 1B. Strike (looking), ball, foul, ball, ball, foul, foul, put in play (fly ball double to right field, runner scores). 3: Runner (Dark) on second. Ball, ball, strike (swinging), ball, ball (walk). 4: Runners on 1B (Mueller) and 2B (Dark). Strike (looking), put in play (ground ball single to right field). 5: Bases loaded. Ball, strike (looking), foul, foul, put in play (flyout to center). 6: Bases loaded. Wild pitch advances each runner one base (Dark scores, no RBI), foul, ball, strike (swinging), ball, ball (walk). 7: Bases loaded. Foul out to the catcher. 8: Ground out 4-3.Second Inning
9: Walk. 10: Maglie on 1B. Flyout to center. 11: Maglie on 1B. Lineout to center. 12: Maglie on 1B. Strikeout swinging.Third Inning
13: Home run to left. 14: Groundout 5-3. 15: Single to center. 16: Thomson on 1B. Ground into 4-6 forceout (previous batter is out). 17: Mays on 1B. Lineout to first baseman.Thanks again for making your scoring system available; it brings me a lot of pleasure.
Your Cart
Your cart is empty.